#include <iostream>
using namespace std;
class node{
public:
node* left;
node* right;
int data;
node(){ left=right=0; } // デフォルトコンストラクタ
node (node* l, node* r, int d){ left=l; right=r; data=d;}; // 引数つき
void printData(){ cout << data << "\n"; };
friend class list;
};
class list{
node* root;
node* last;
public:
list(); // デフォルトコンストラクタ
~list(); // デストラクタ
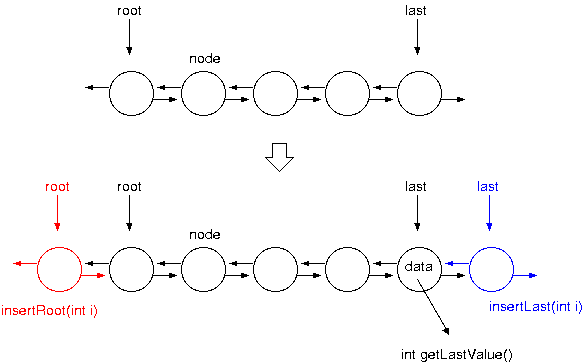
void insertRoot(int d);
void insertLast(int d);
int getLastValue();
void printAll();
};
// デフォルトコンストラクタ
list::list(){
root = 0;
last = 0; // ヌルポインタで初期化
}
// デストラクタ
list::~list(){
node *nl;
node *nr;
nl=root;
while(nl!=0){
nr = nl->right;
delete nl;
nl = nr;
}
}
void list::insertRoot(int d){
if(last==0){ // root==0 でもよい
root = new node(0,0,d); // last = new node(0,0,d); root = last; でも同じ
last = root;
}else{
root->left = new node(0,root,d); // 新たな node を root の左側に
root = root->left; // root ポインタのつけ変え
}
}
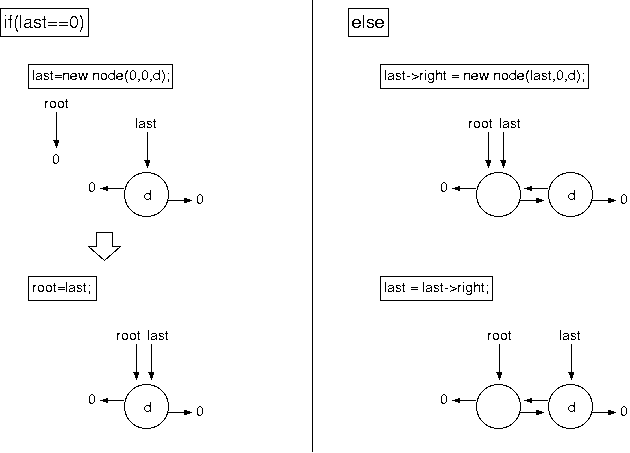
void list::insertLast(int d){
if(last==0){ // last に node がない (同時に root にも node がない)
last = new node(0,0,d);
root = last;
}else{
last->right = new node(last,0,d); // 新たな node を last の右側に
last = last->right; // last ポインタのつけ変え
}
}
int list::getLastValue(){
if(last != 0){ // ヌルポインタでなかったら
return(last->data);
}else{
return(0);
}
}
void list::printAll(){
node *n;
n=root;
while(n!=0){
n->printData();
n=n->right;
}
}
int main(){
list l;
for(int i=0 ; i<10 ; i++){
l.insertLast(i);
}
l.printAll();
return(0);
}
|